Wednesday, September 30, 2009

One Carrot Necklace


One carrot necklace
Originally uploaded by STRJKTKNITTING

Pattern from
adhdknitting
This is a fun way to show off to your friends how many Carrot’s you have on your necklace, rings, bracelets or earrings.  I have the cutest little tinniest, tiniest carrots made to use as baguettes to go around my One Carrot necklace. I will post pics later.


What you’ll need to create your own Carrot jewelry:
  • needle felting needle
  • roving wool (orange and green)
  • jump ring (I used an orange jump ring to match)
  • chain or anything to hang your carrot onto.
  • Styrofoam pad or needle felting pad.
  • If you are making a ring, bracelet or earrings, then you will need the appropriate hardware for that.
Here's how:
  • With your orange color roving wool and your needle felting needle, take a small amount of wool and roll in between the palms of your hand to create a worm like shape. Size is completely a matter of preference and what piece of jewelry you are going to make.
  • Then with a small Styrofoam pad and your felting needle you are going to start to form the shape of a carrot, easily done by starting at the thickest end and narrowing it down to the bottom, making sure to poke it until it is completely felted. 
  • Then with the green roving wool and the needle, add the topper to the carrot by simply poking it into the top of the carrot to join.  
  • *You can add leaves or a vine and use the vine as the necklace part.
  • Then add your jump ring through the middle of the green top and place onto a piece of leather or chain or whatever you choose. 
  • Make a One Carrot piece of jewelry or as many Carrots as you like.  

 This was a post I received from one of our Ravelry members regarding the pattern.


From: KnittingSM
replied
Today
12:09 PM

re: KnittingSM commented on your One Carrot Necklace
Sent at 12:01 PM Today
Brilliantly funny. It was the day before Thanksgiving and they were getting some last minute supplies. They are both in the produce section and he calls out “Baby, do we need some carrots?”
She: “No, we’ve got them.” (not looking up)
He: “Baby, how about we get some carrots?”
She: “Aaron, I already told you we have them!” (still not looking up)
He: “baby, how about a half carrot?”
Finally looks up to see the ring, starts crying. The manager came over worried about what was going on. My brother “We just got engaged in your produce section!!” manager gave them a bouquet of flowers as congrats.
I’ll have to keep the necklace in mind if you post a pattern. I think she’d love one.


Monday, September 28, 2009

Pass the Jeans Please

PTJPPTJPArtfelt needle felting

I am also including this little cool photo/note combo piece so each person that the jeans are passed to next will write something in it of why/what they did on the jeans and a quick picture of them next to the jean, or in the jeans or on top of them whatever.

I thought this would be fun… Here it goes…I am going to take a pair of plain jeans and I am going to mail them to who ever signs up for this experiment. The idea is for each person that receives the jeans, to either embroider, sew, bead, paint, iron, quilt, needle felt, design, etc. something onto the jeans and then mail them onto the next person on the list. You can keep the jeans anywhere from 1-3 day’s to create your design idea…Then mail them on to the next person on the list, and sew on and sew on.  All in fun…If this is a successful Pass-Along then anyone who has participated in this project will be on the list to send the next pair of their jeans…
Here are some ideas…
My Embellished ADHD pants.mooembellished jeans


Thursday, September 24, 2009

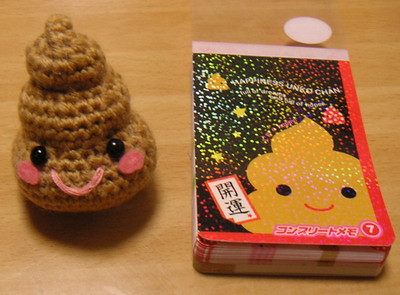
poop

Why do we need a “POOP” chart?
The more important question is, Why did I need to start a subject on a POOP chart? Why did I have to capitalize the word “POOP” in my post? Life’s unanswered questions.


poop chart

Some POOPY Patterns and other related Poopy things from different designers across the web.
http://www.flickr.com/photos/pocketfarm/

it's a (knitted) poop! by pocket farmer.

CO 6 st. Join to knit in the round. (I used size 7 needles and Plymouth Tweed yarn)
Increase 2 st (8 st total)
Knit around.
Increase 4 st every other row until you have 16 st
Knit 3 rows
Decrease 4 st every other row until you have 8 st
Knit around
Decrease 2 st (6 st remaining)

Take the opportunity to add stuffing before starting the next lobe.

Next row, increase 2 st,
then increase the same way as for the first lobe, except vary slightly by doing more increases,
and/or more plain rows before decreasing.

Knit as many lobes as desired, stuffing as you go.
When you have six st remaining, put yarn on a tapestry needle,
and thread through the stitches.
Happy Poo Pattern
happy poo
Here it is, the Happy Poo pattern. I'm not used to writing down patterns. I'm more accustomed to the Jpns way of using number charts, so my apologies to those who prefer written instructions. If there is anything that seems unclear, please let me know.


sc = single crochet
Work in rounds. It's up to you if you want to join rounds or not
Make adjustable loop. (Here's a link that shows you how : Adjustable Loop)ROUND 1 - 6sc
ROUND 2 - 12sc
ROUND 3 - 18sc
ROUND 4 - 24sc
ROUND 5 - 30sc
ROUND 6 - 36sc
ROUND 7 - 36sc
ROUND 8 - 30sc
ROUND 9 - 24sc
ROUND 10 - 18sc
ROUND 11 - 12sc
ROUND 12 - 18sc
ROUND 13 - 24sc
ROUND 14 - 24sc
ROUND 15 - 24sc
ROUND 16 - 18sc
ROUND 17 - 12sc
ROUND 18 - 6sc
ROUND 19 - 12sc
ROUND 20 - 18sc
ROUND 21 - 12sc
ROUND 22 - 6sc
ROUND 23 - 6scDon't forget to add the stuffing before you're done that top layer. When you're finished leave a tail long enough to cinch up between the layers. Add the face and voila, your very own little Happy Poo! 
This pattern is for personal use only. You cannot use this pattern for profit.


http://wastesomecash.com/party-pooper-fake-poop.html?gclid=CJSFg6Wrhp0CFSn6agodRFvDag
fake human poopy
alt text


 Pop Art Roll of toilet paper toilet paper cozy cover:
I found this on the http://craftside.typepad.com/craftside/april-24-30-09/ blog and would like to give her full credit for the pattern. She calls it Pop Art. I call it Pretty Darn Cute! 
Roll of toilet paper cozy cover

Pretty funny, hu?
To make your own TP cozy you'll need:
Materials
Gray worsted weight yarn
White Worsted weight yarn
size H crochet hook
yarn needle
How to crochet the roll of toilet paper cozy:
With the gray yarn:
Chain 4 and slip stitch to join
Chain 1
About 15 sc into circle and join
chain 1
single crochet around again, about every 3rd or 4th stitch do a second sc in the same loop. This will increase the size of the circle allowing it to stay flat. Adjust number of stitches as needed to lay flat.
Cut gray yarn and weave in the end.
With the white yarn:
SC around gray circle every few stitches doing two sc in one loop. Join each circle, then chain 1 and repeat until you have a circle the size of your roll of toilet paper. For me this was about 6 rows (circles)
For the side:
Chain 15
Chain 1 and sc into second to last stitch.
SC back into every chain stitch, chain 1, turn and sc back into every stitch. Adjust number of stitches as needed for your roll of toilet paper.
Repeat until you have a strip long enough to go around the entire roll of toilet paper plus a few inches to fall open. For me it was about 20 inches.
Stitch the top to the sides and then join the beginning of the side strip under the falling open end.
Weave in all the ends.
Mr. Poopyhead

poopy-head-father-in-lawShhexy gives a helping hand

halloween
http://www.halloweenexpress.com/poopie-shorts-adult-costume-p-3956.html


poop pants


Sunday, September 13, 2009

Pink decoupaged guitar


I loved making this $10.00 guitar scream "L@@K" at me. This was a plain guitar that was purchased at a fair here in Vegas. It cost a whole $10.00, the embellishments, pretty much free, I used pictures from craft magazines that I already had. The glue, decoupage glue can be purchased at Walmart or any craft store and Sealant gloss or matte. Sand paper is optional, but I recommend using it to prepare your surface so that the pictures adhere and stay better. The rest is all up to you. You can go with a color scheme and theme. Or you can just go wild and tear and paste anything that you think will look good. To see different angles and views of this sweet guitar, just click on the link under the picture.


Saturday, September 12, 2009

Season Clearing House

This is the perfect time of year to pack away the summer and bring on the wooly. That is if you lived any other place but the desert. Although we do have somewhat of a climate change, we are still not hitting those low temps on the thermometers. I have been living in Las Vegas for over three decades now, and I swear I say the same thing every single year, "Is it me, or is it colder this year then it was last year? I think the real answer to that question is, "I am getting older, my bloods getting thinner and so is my skin". I dare not complain though, I would hate to put a damper on our wonderful fall/winter seasons. So the whole point of this story is that when I was going through closets and closets of clothes, I came across things that I hadn't seen in years. I actually found a dress that I loved and hadn't worn in at least 15 years or so. I decide I could really put myself in a great mood or I can sink my battleship. Should I dare try on this dress? I did, it fit, I'm stoked, and that dress ain't goin' anywhere. It is going to hang right there in my closet until another decade or so rolls by. I will post a pic of me in this dress, so you can see what I mean, when I say how pleased I am that the dress still fits.

Thursday, September 10, 2009

You can make all kinds of fantastic pieces with buttons. I love, love, love buttons. I could spend hours just sorting through all these unique little treasures. The options are endless. So gather up those buttons and create something.


Tuesday, September 8, 2009

Olivia's Digg's


My beautiful baby Olivia.
 This is my newest niece. Isn't she gorgeous. She is wearing one of my latest designs. Called "Olivia's Diggs".
These are the perfect gift for that special little girl. Onesies are always in style and every baby wears them.

Perfect Paper Doll Keepsake Collection

Perfect Paper Doll Collection
This is a wonderful way to keep your little ones enchanted for hours on end. You can make these wonderful paper doll keepsake boxes and dolls complete with an entire wardrobe and accessories fit for any princess. These paper dolls can be played with, without worrying about paper cuts and little tears. Never have to worry about those little folds getting torn off, because to make these little treasures you will cut them off yourself.  So gather up all your supplies and make your little princess her very own keepsake to past on from generation to generation. 

WHAT YOU'LL NEED:
  1. scissor
  2. printed color or black and white copies of paper dolls. You can either get these from the internet or use old paper dolls from many other resources. Here is a great source for your cut outs. http://alteredartfun.blogspot.com/2009/02/vintage-paperdolls.html
  3. decoupage glue http://www.plaidonline.com/apmp.asp#ModPodgeBrands
  4. a box (Pier 1 is a great resource for unique shaped boxes). http://www.pier1.com/SearchResults/tabid/37/txtSearch/boxes/Search/boxes/List/0/Default.aspx
  5. reusable adhesive The most important part of the whole project. http://www.acecatalog.com/bluestiktrade_reusable_adhesive-pi-27466.html Any brand is fine, just make sure it is OK for age appropriate children.
  6. laminate http://www.epinions.com/review/Avery_Self_Stick_Laminating_Sheets_9_x_12_3_mil_50_Sheets_Box/content_27328194522 (I have my own laminate machine, but you can use the Self Stick Laminating Sheets. They are reasonable in price and work just as well.
  7. brush for use with decoupage, I like to use a sponge brush.Here is the kind I use, they come in different sizes. http://www.woodcrafter.com/rpb11inspongebrushpkg10.aspx     
  8. sealant This is optional, but I love the finished look of this. This is the brand I use. http://www.dickblick.com/products/krylon-triple-thick-crystal-clear-glaze/?wmcp=cj&wmcid=feeds&wmckw=21710-1005-2342&AID=10495307&PID=1609763&SID=tfc_-_11_6_090908_e11deec4d563a3478557f9206308    
  9. brayer http://www.misterart.com/g453/Speedball-Rubber-Brayer.htm
HERE'S HOW TO MAKE THE PAPER DOLLS: 

  1. Print out all the paper dolls that you are going to use.
  2. Then before you are ready to laminate them, cut them out, not detailed cutting, but just so that you can fit as many paper dolls on the page as possible. Then you are going to laminate them.
  3. After all the dolls, wardrobe and accessories are all laminated, take a sharp pair of scissors and start cutting each piece out neatly. Make sure that you also cut the little tabs off that you would normally keep on if you were cutting out paper dolls the old fashion way. 
  4. Now with the reusable putty, add some little dabs to the front of your paper doll and then you can start to dress your doll with any outfit your little heart desires. 

HERE'S HOW TO MAKE THE KEEPSAKE DECOUPAGE BOX:
  1. Cut out enough paper dolls and accessories as needed to cover the inside and outside of your box.
  2. Now you are going to add a coat of decoupage glue to the portion of the box you are ready to place your paper dolls onto. 
  3. Continue adding all your cutouts leaving the paper doll tabs on this time for the effect. 
  4. When your entire box is covered to your satisfaction, it is now time to completely coat the entire box.
  5. Let dry over night, and then you can add as many coats as you like to give it a sealed, glossy or matte look, depending on the type of Decoupage glue you are going to use. You can also use regular white craft glue, but I suggest you add water to thin it out.
  6. Then when you are sure that every inch of the box is dry, you can seal it with a Sealant. That is optional. I love to add this extra step, I love the look of this.
  7. Now take all your laminated paper dolls and putty and fill up your Decoupaged Paper Doll Keepsake Box.


Monday, September 7, 2009

and were back again...

That is were back to changing the name of my Ravelry group from ADHD KNITTERS to STRAIGHT JACKET KNITTING, and now to ADHDKNITTING. Now having done this, I cannot get into my own group to edit anything. I forgot to make myself the Administrator. I have sent a letter to the Help folks on Ravelry and hopefully they will help me out. Fingers crossed.

Friday, September 4, 2009

Famous Chicken Salad, NOT, but damn good chicken salad...

Recipe to my Famous Chicken Salad
Here's what you'll need:
Chicken (whole chicken) or you can just use chicken breasts.
celery
onions
fat-free mayo
garlic salt
pepper
*carrots optional for the soup broth when the chicken is cooked.
Here's how:
With a large pot, fill with water and add all the above ingredients except for the mayo. Cover and cook on a low light until the chicken is completely cooked.
Take the chicken out of the pot and put aside until it cools down enough for you to remove all the chicken from the bone.
With a large mixing bowl, add the chicken, meat only, making sure that you have removed all the skin, bones, and gristle.
Of course your hands and your nails should be spotless.
Take your onions and celery and with a grater, grate them on the smallest grate directly into the bowl with the chicken.
Add the seasonings and the mayo.
Here's the most important part, with your hands start to mix the ingredients until the chicken salad is the consistency of a spread. Trust me on this. Then take tin foil or plastic wrap and place in refrigerator for a couple hours to let it cool down and to let all the ingredients ferment. We love to serve on large fresh rolls with lettuce, tomatoes and onions.
The broth is perfect as a side dish with egg noodles to complete this meal.

Tuesday, September 1, 2009

Now this is priceless...

We all love our ice-cream, but really...

Snakes Charmed I'm Sure

Snakes Charmed I'm Sure

Knitted, felted snakes attached to a knitted felted wool basket. I love the idea of these colorful snakes slithering around this charming basket. A great way to keep your yarn or your UFO's in order. The double headed snake above the lip of the basket separates this snake charmer from all the rest.